We’ve all been there: you spend thirty minutes curling your locks, only to watch them fall completely flat before you even leave the driveway. This frustration is known in salons as the "Slippery Hair" phenomenon, a state where perfectly healthy strands simply refuse to hold a shape. Rather than viewing this texture as difficult, it helps to treat it as a beautiful, albeit stubborn, blank canvas. The issue isn't your technique; your natural foundation just requires a specialized approach to styling.
According to hair science, the secret behind both this slipperiness and your incredible natural shine lies in the cuticle—the microscopic, outermost layer of each individual hair strand. Picture the cuticle like overlapping shingles on a roof. On naturally straight hair, these shingles lie perfectly flat and closed, creating a smooth surface that acts like a mirror to maximize cuticle-light reflection. While this glass-like texture makes it notoriously hard for bobby pins to grip, this brilliant glossiness is actually one of your greatest straight hair advantages.
Instead of constantly fighting against this sleekness, you can harness it to build effortlessly elegant hairstyles that other hair types often struggle to achieve. A few simple product adjustments can easily add the necessary friction to your strands without dulling that signature finish. Once you learn to work with your hair's natural architecture rather than forcing it into unnatural shapes, your morning routine becomes significantly less stressful.
Misunderstanding specific hair sub-types often leads to buying a volumizing spray only to end up with greasy, flat locks. To master your routine, you must learn the difference between hair density vs thickness. Think of density as a forest—it’s how many trees (hair strands) grow on your scalp. Texture is the width of a single trunk. You can have fine hair (skinny trunks) but high density (many trees), meaning heavy products will still drag everything down.
Try this quick test to distinguish between naturally fine-textured strands and overall hair thinning:
Lay a single, dry strand of hair next to a regular sewing thread.
Compare the width: if your hair is thinner than the thread, your texture is fine.
Tie your hair into a ponytail: a base smaller than two inches around indicates low density.
Knowing your exact weight needs unlocks the best hairstyles for straight hair. Fine strands require lightweight, water-based mousses, while coarse strands need richer styling creams. However, scalp oils easily slide down those straight, fine shafts, creating a need to fix oily roots and dry ends simultaneously.
Does your hair feel clean at the roots but like straw at the tips? This happens because of sebum migration—the rapid travel rate of scalp oils down the hair shaft. Think of straight hair as a playground slide; without curls to act as speedbumps, oil slides down easily, making roots greasy while abandoning ends to dry out.
Solving this means changing how you wash. When fixing oily roots and dry ends, your best defense is a gentle clarifying shampoo—a deep-cleansing formula designed to remove buildup without stripping moisture. Focus this product strictly on your scalp where the oil lives, massaging it in rather than scrubbing the lengths. Prioritizing scalp health creates a balanced foundation, keeping roots lifted while protecting fragile ends from harsh suds.
To shield those vulnerable tips, deploy Zonal Conditioning. Instead of slathering hydration everywhere, apply conditioner strictly from the ears down to create a protective barrier exactly where the hair needs it most. This targeted approach is vital for everyday straight hair maintenance, ensuring your crown stays bouncy and your lengths stay smooth.
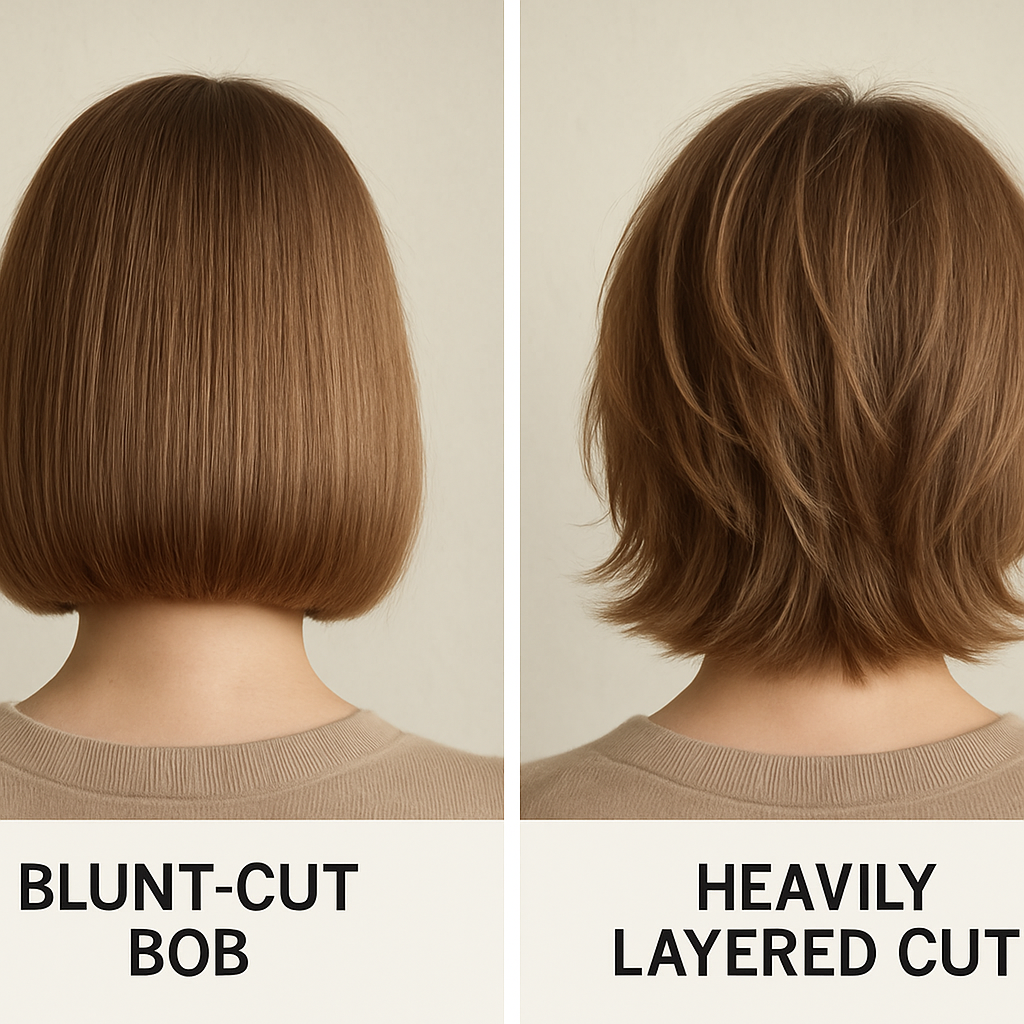
Staring in the mirror, you might wonder why your ends look wispy after a fresh wash. This frustration comes down to visual density—the optical illusion of thickness created by how hair is shaped at the bottom. When choosing between blunt cut vs layered hairstyles, people with fine, straight hair often mistakenly ask for layers, hoping for "bounce."
Look at the bottom edge of your hair; stylists call this the weight line, the foundation where the bulk of your hair rests. Think of a broom: when bristles are cut cleanly at the exact same length, the broom looks thick. A sharp, blunt edge works exactly the same way, stacking every strand directly on top of each other to instantly create the illusion of 20% more hair.
Conversely, asking a stylist to thin out your ends removes that crucial structural support. Every layer literally takes hair away from the bottom perimeter, leaving fine hair looking stringy at the shoulders. Sticking to a solid, un-layered perimeter ranks among the smartest low maintenance cuts for fine straight hair because it requires almost no styling to look full.
Deciding whether to keep that solid edge depends entirely on your overall length and styling goals. While a blunt bob works miracles for fine hair sitting above the collarbone, longer hair sometimes needs strategic movement to avoid dragging your features down.
Letting heavy strands grow past your shoulders can suddenly drag your features downward. Here, face framing layers for long hair become your best asset, adding front-facing movement without sacrificing your overall perimeter thickness. The trick to keeping these additions from looking chunky is point-cutting—a technique where the stylist snips vertically into the ends rather than cutting straight across. This creates softened, feathery edges that remove bulky weight around your face while keeping the rest of your long straight hair styles completely intact.
The secret to personalizing this look is the "Chin-Start" rule, which dictates that your shortest layer should generally begin near the jawline to maintain structural balance. By adjusting exactly where this initial piece falls, you can create elegant hairstyles that act like physical contour makeup for your bone structure. Discuss these targeted starting points with your stylist based on your features:
Round faces: Start layers down at the collarbone to visually elongate the neck and draw the eye downward.
Square faces: Begin exactly at the jawline to soften angular corners and gently frame the chin.
Oval faces: Launch layers higher up at the cheekbones to immediately highlight your eyes and add width.
Even with a perfectly tailored, weightless frame around your face, long hair naturally fights a constant battle against its own heavy pull.
Beautifully styled hairstyles for straight hair often surrender to gravity before lunchtime. To add volume to flat hair instantly, try the simplest cheat: flip your parting to the opposite side. Because your strands are naturally trained to lay flat in one direction, forcing them over creates immediate, effortless height at the crown without requiring any styling tools.
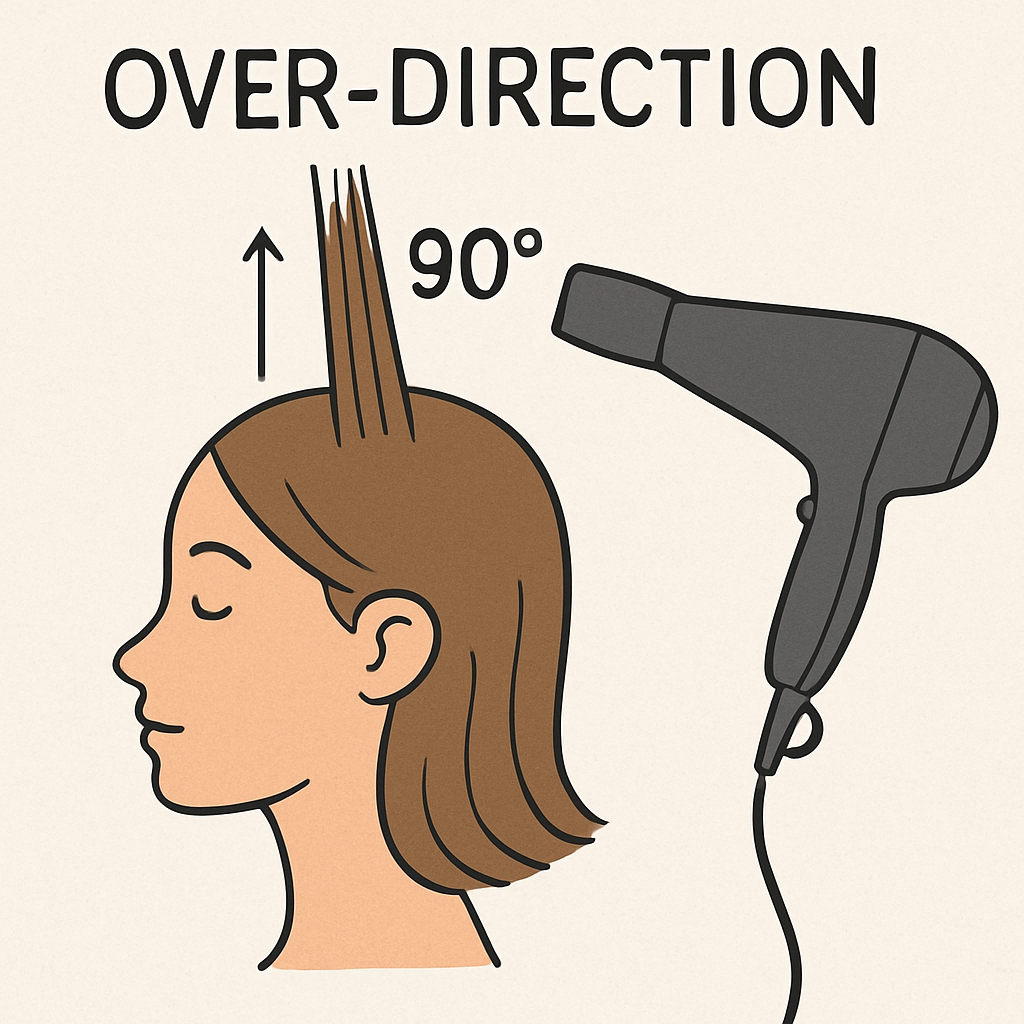
When using a blow dryer, mastering over-direction—pulling the hair exactly opposite to where it naturally falls—is your best defense against persistent flatness. Imagine propping up a leaning plant stake; by brushing your roots straight up toward the ceiling while applying heat, you physically retrain the hair's base to stand at attention.
This strategy relies on manipulating your hair's internal molecular structure. Hot air softens hydrogen bonds (the temporary structural links that determine hair shape), letting you easily mold that upward lift. However, the true secret to effective root lift techniques is cool-shot locking. Hitting your dryer's cold air button for five seconds while holding the hair up instantly freezes those bonds in their newly lifted position, preventing them from collapsing back against your scalp.
Controlling these styling temperatures ensures your bouncy volume survives a long office day or a windy commute. Once you build this lifted, airy foundation at the roots, your blank canvas is finally ready for choppier silhouettes.
Straight hair shows every blunt line—so test structure digitally first. HairPick factors in slip-prone texture, density, and face shape, then proposes ten cuts that will actually hold movement for your fabric, with photoreal previews and barber-ready steps.
Many assume a messy vibe requires natural wave, but the right salon technique easily transforms your flat canvas. To secure a modern shag haircut for straight strands—a standout among cool hairstyles for straight hair guys and women alike—the secret is in the scissors. Ask your stylist for "disconnected sections," where lengths intentionally skip blending. They use internal layering—cutting shorter pieces underneath the surface to remove bulk—creating architectural scaffolding so your smooth locks can finally swing.
Armed with this foundation, texturizing straight hair becomes incredibly simple. Instead of fighting your strands with curling irons, rely on styling pastes to mimic the gritty movement of wavy hair. Think of these products as liquid friction; they coat those disconnected layers, forcing them to grab onto each other rather than slipping flat against your scalp.
Best of all, you can style this choppy look in under ten minutes using only your fingers and a dime-sized dab of matte paste. Rub the product into your fingertips, then scrunch the ends upward as if crumbling paper. This fast routine proves your hair can handle edgy texture.
If a choppy shag feels too rebellious, a structured cut might be your perfect match. Deciding on a chin length bob versus lob (long bob) ultimately comes down to your neck structure and anatomy. A sharp, chin-length cut beautifully elongates the neck, while a lob softens your features by resting gracefully near the collarbone.
Daily styling effort drastically changes between these lengths because of shoulder-grazing physics. When straight hair hits the shoulders, it naturally flips outward. A lob embraces this gentle kick and can easily be pulled back into a ponytail on busy mornings. Conversely, a shorter cut avoids the shoulders entirely, allowing your strands to swing freely without snagging. This lack of friction makes short bob styles for thin hair appear instantly thicker at the ends, much like the densely packed bristles of a freshly cut paintbrush.
To choose wisely, consider your ideal maintenance cycles—how often you are willing to visit the salon to prevent the shape from looking bulky and overgrown:
Classic Bob: Requires precise trims every 6 weeks to maintain sharp lines, but rewards you with built-in volume and minimal daily heat styling.
The Lob: Stretches your salon appointments to 10 weeks and easily forgives skipped wash days, though it will take slightly longer to blow-dry.
Either length produces undeniably elegant hairstyles that highlight straight hair’s glassy shine.
Attempting that retro vibe on straight hair often results in two flat, disconnected pieces hanging over your eyes. The secret to mastering curtain bangs for straight textures is seamless blending. Ask your stylist to connect the shortest points diagonally into longer face-framing bangs. This creates a gentle cascade—like a staircase guiding the eye down your cheekbones—ensuring the fringe flows naturally into your overall cut.
Styling these layers relies on a physical technique called the 'Away-from-Face' roll. Building on your basic round brush skills, simply place the barrel under your damp bangs, lift straight up toward the ceiling for volume, and roll the brush backward away from your forehead while applying heat. Letting the hair cool in this backward position sets the cuticles, creating softly winged edges that sweep gracefully out of your vision.
Defending these elegant hairstyles against afternoon flatness requires a preventative trick known as "fringe priming." Straight hair resting against the face absorbs natural oils rapidly, causing the bangs to separate and droop. Misting a translucent dry shampoo directly onto your freshly styled fringe creates an invisible, powder-based barrier that absorbs moisture before it compromises your volume.
Spending fifty dollars a week on a professional stylist adds up quickly, but replicating that bouncy, mirror-like finish yourself often feels impossible. The frustration usually stems from attempting to manipulate soaking wet hair, which causes unnecessary arm fatigue and heat damage. By mastering a few core mechanics, achieving a salon quality blowout at home becomes a realistic, budget-friendly reality rather than an exhausting chore.
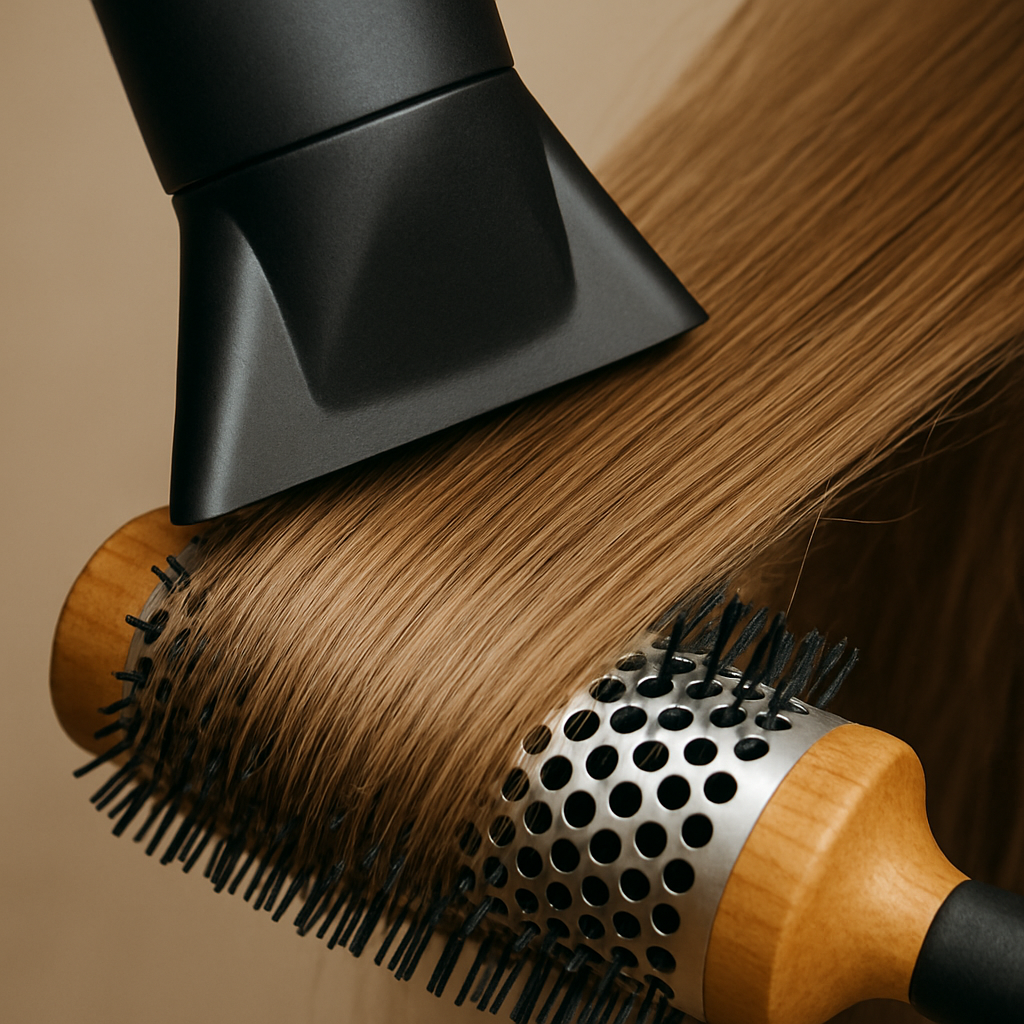
Before picking up a brush, you must follow the 80% Dry Rule: rough-dry your hair with your fingers until the moisture is mostly gone. During this phase, applying the best hair products for glass hair finish—like a lightweight smoothing serum—sets your foundation. Next, attach the concentrator nozzle to your dryer to direct the airflow downward from roots to ends, flattening the cuticle layer to eliminate frizz.
Building on your ability to handle a round brush and dryer simultaneously, the secret to smoothing the remaining lengths is tension-styling. Think of tension like ironing a wrinkled shirt; pulling the hair gently but firmly taut across the bristles provides the physical stretch required to smooth the shaft without painful yanking. Crucial heat styling tips emphasize that while temperature makes the strands malleable, tension is what actually straightens them.
Combining steady tension with controlled, downward airflow transforms your basic straight texture into a glossy, professional masterpiece.
Upgrading a basic gym ponytail into elegant hairstyles requires strategic placement. To find your most flattering height, use the Jawline Alignment Rule: imagine a diagonal line tracing from your chin, past your cheekbone, to your crown. Securing your ponytail at this intersection visually lifts your features. To ensure it stays tight and high for 12 hours, spray a bristle brush with hairspray before sweeping strands back; this adds grip without the flatness often seen in low maintenance cuts for fine straight hair.
An exposed elastic instantly breaks this polished illusion. Mastering professional sleek ponytail techniques means learning the "Wrapped Base" method to disguise that band:
Separate a pencil-thin hair section from the ponytail's underside.
Wrap this strand tightly around the elastic until only the tip remains.
Slide a bobby pin upward under the base to lock the end invisibly in place.
This quick architectural trick elevates your look from casual to high-fashion instantly.
Twisting smooth strands into a chic style often results in the hair sliding down your neck minutes later. Securing formal updos for sleek hair textures feels impossible when strands act like polished glass. The secret to lasting elegant hairstyles isn't using endless bobby pins, but rather altering your foundation.
To stop this slide, you must build friction. Think of hairstyles for straight hair like building on slippery silk; accessories simply glide off without grip. By misting a dry texture spray—an aerosol depositing invisible, gritty powders—you instantly transform that smooth silk into a textured fabric. This quick preparation ensures your strands grab onto each other rather than slipping apart when twisted.
Once prepped, your ultimate defense against gravity becomes the Cross-Pin Anchor. Rather than sliding bobby pins in parallel, push one pin directly into your updo's base, then intersect a second pin across it to form a rigid "X" shape. This simple interlocking action traps the hair securely between the metal arms, creating an unshakeable structural hold that refuses to budge.
Mastering this grippy foundation alongside the X-Pin technique lets you execute a stunning formal look in under 15 minutes.
Waking up to styled hair sounds like a myth, especially when you're used to preventing heat damage from flat irons. The secret to any heatless waves for straight hair tutorial is evaporative setting—a process where hair reshapes itself as it transitions from damp to completely dry. The golden rule is moisture control. Your strands should feel like a thoroughly wrung-out towel, roughly 80% dry. If your hair is soaking wet, the core won't dry overnight, leaving you with limp strands that instantly fall flat.
Your chosen wrapping technique dictates the final shape of these easy hairstyles for straight hair:
Classic Braiding: Yields a crimped, piecey mermaid texture.
The Robe-Belt Method: Acts like a soft, oversized roller. By wrapping sections around a plush fabric belt placed across your crown, you create large, bouncy curls.
Twisted Buns: Coiling your hair into two high buns produces loose, effortless beach waves focused at the ends.
To guarantee a smooth finish, patience is absolutely essential. Removing your tools before the hair is 100% dry or aggressively pulling the fabric out will instantly disrupt the cuticle and create frizz. Instead, gently unwrap the sections and let the curls drop naturally before lightly shaking the roots with your fingertips.
Getting freshly unwrapped waves to gleam requires understanding how your strands interact with light. Think of your hair's outer layer—the cuticle—like a microscopic mirror. When it lies perfectly flat, light bounces off evenly, creating an ultra-reflective gleam. If the cuticle is raised, light scatters, resulting in a dull appearance that masks the detail in everyday hairstyles for straight hair.
The secret to this high-gloss effect lies in moisture trapping, a process where ingredients lock hydration inside the hair shaft to force that cuticle down. You need to find the best hair products for glass hair finish that boost your hair's reflective index—its ability to bounce back light—without leaving greasy residue. Choose a lightweight finishing serum to create a microscopic film that adds immense shine without adding weight.
To ensure your style lasts, always follow a strict application order to maximize these hair shine tips. Apply products by density: start with a hydrating cream to moisturize, seal the cuticle with a lightweight oil, and finish with a shine spray.
Seeing a white cloud rise from freshly clamped hair induces a sudden panic. While thermal tools are essential for achieving the sleekest hairstyles for straight hair, they require a strategic approach to preventing heat damage from flat irons. Before styling, always apply a protectant containing heat-activated polymers—smart ingredients that act like microscopic armor to shield your strands when warmed. This barrier is critical because human hair has a keratin melting point (the exact temperature where your hair’s structural proteins permanently break apart).
Mastering flat iron safety requires adjusting your tool to match your hair's diameter: fine strands only need 250°F to 300°F, while thick hair can tolerate up to 350°F. Implement the "One-Pass" rule by gliding the iron slowly and steadily over a section once, rather than frantically clamping it five times. Additionally, learn to distinguish harmless steam (product moisture evaporating) from dangerous smoke (burning hair that smells like a campfire). If you consistently ignore these limits, you will notice these three signs of irreversible heat damage:
Hair feeling gummy or oddly stretchy when wet.
Split ends traveling aggressively up the middle of the hair shaft.
Severe breakage that leaves your straight hair looking frayed and fuzzy.
Prioritizing the health of your canvas ensures your strands remain strong, reflective, and resilient.
Finding the right look often feels like a battle against gravity when dealing with pin-straight strands. Fortunately, mastering men's straight hair styling doesn't require hours of effort. You can easily unlock cool hairstyles for straight hair guys by upgrading your barber visits and daily routine.
Your first goal is avoiding the heavy, blocky appearance known as "helmet hair." Always ask your stylist for "point-cutting"—a technique where they snip vertically into the tips rather than straight across. This removes bulk and creates movement, whether you prefer a short, textured crop or a longer modern shag haircut for straight strands.
At home, you need to guide those stubborn locks using a process called "hair training." Think of damp hair like warm wax that holds whatever shape it cools in. Using a blow dryer to push your hair backward or to the side while it dries physically teaches the roots to lay in that specific direction, setting your style without relying on heavy gels.
Finally, finish your shape by choosing between a matte or shine product. A matte clay—a dry, earthy paste that absorbs light—provides gritty, invisible texture for relaxed weekend looks. Conversely, a high-shine pomade reflects light perfectly for sharp, slicked-back office profiles.
Waking up and walking out the door feels impossible when your hair lies perfectly flat against your scalp. The secret to effortless mornings is "natural fall alignment"—a cutting technique that follows exactly how your hair naturally rests. When your cut respects this built-in direction, your only required product becomes a lightweight leave-in conditioner. Think of this spray like a daily hair vitamin: it smooths flyaways and adds hydration without weighing down delicate strands.
Stretching salon visits from six weeks to a budget-friendly twelve weeks requires "growth-cycle cutting," meaning the stylist shapes the ends to look intentional as they lengthen. For truly low maintenance cuts for fine straight hair, request these four options that thrive as they grow:
The Soft Blunt Bob: Keeps ends thick to create the illusion of density.
The Grown-Out Pixie: Transitions seamlessly into a short, messy crop.
Face-Framing Layers: Adds shape around the chin without requiring constant trims.
The Collarbone Lob: Maintains its clean, elegant lines for months.
Embracing these specific hairstyles for straight hair turns frustrating mornings into completely easy hair routines where you simply wash, mist, and air-dry.
Spending thirty minutes creating beautiful hairstyles for straight hair, only to watch them vanish before the commute ends, is incredibly frustrating. If your strands feel suspiciously "slippery" or heavy two hours later, you likely lack styling memory—the hair's ability to hold a new shape. This frustrating slip happens due to your naturally silky texture, but is frequently worsened by invisible product buildup acting like a heavy wax on your roots.
Trying to fix this droop with the wrong product is a common mistake that quickly kills hair styling longevity. Many people grab a traditional finishing spray (like a stiff freeze spray) to lock a look in place, which just leaves straight hair crunchy. Instead, you need a working spray—a flexible mist applied while you style, creating invisible scaffolding that supports the hair but still allows for natural movement.
The ultimate cheat code for learning how to add volume to flat hair actually happens while you sleep. Applying dry shampoo at night absorbs oil before it can weigh down your strands, ensuring you wake up with lifted roots.
Building a foundation means nothing if you burn out styling every single morning. Washing and heat-styling daily strips away your natural shine and leaves strands brittle and exhausted. Instead of fighting your flat texture from scratch every dawn, the secret to effortless hairstyles for straight hair is strategic scheduling.
The 7-Day Hair Rotation solves this daily fatigue by treating your week like a marathon rather than a sprint. Think of this routine as meal prepping for your locks; you do the heavy lifting with hot tools on wash day, then coast on easy, adaptive looks as the days pass. Cycling through different techniques minimizes heat damage while maximizing your hair’s health and bounce.
Strategic product choices keep this progression seamless as the week goes on. Freshly washed hair utilizes the flexible working spray we discussed for initial volume, while day-three hair relies heavily on overnight dry shampoo to absorb oil and revive roots. This natural evolution allows you to smoothly shift from bouncy blowouts to low-maintenance updos without ever looking unpolished.
To put this theory into practice, try following this straightforward straight hair routine for your next week:
Day 1 (Volume): Wash, apply heat protectant, and blow-dry for maximum lift.
Day 2 (Maintain): Wear down, relying on your styling memory. Apply dry shampoo before bed.
Day 3 (Half-Up): Create a quick half-up knot to hide flatter roots while showcasing the lengths.
Day 4 (Sleek): Embrace natural slip by gathering your strands into a sleek, polished bun.
Day 5 (Heatless): Lightly dampen ends and braid overnight to create heatless texture.
Day 6 (Texture): Pin your newly formed waves into elegant hairstyles like a loose French twist.
Day 7 (Treat): Apply a deep conditioning mask and let your scalp rest.
When you stop forcing the exact same look daily, your mornings become vastly less stressful. This rhythm prepares you for humid weather or a windy commute with zero panic.
You no longer have to view your straight strands as a frustratingly flat, slippery canvas. Armed with tension, heat control, and the right product scaffolding, you can now command volume and build lasting hairstyles for straight hair.
Your Quick-Win Cheat Sheet:
The Cuticle Rule: Always blow-dry pointing downwards to smooth the hair shaft and prevent frizz.
Root Lift: Dry your roots pulling upwards to build instant, natural volume.
Sleek Shine: Apply lightweight serums from mid-shaft to ends for a mirror-like glass hair finish.
Grit is Good: Use texturizing spray to keep bobby pins and hair ties from sliding out.
Cool to Lock: Let heat-styled waves completely cool before brushing them out.
Your natural texture isn't a limitation; it's the ultimate sleek foundation. Take these hair styling tips and test just one technique tomorrow morning. You'll quickly discover that effortless, polished movement is finally in your hands.